Section-1:
Creating different types of
buttons in scada
Types of buttons in scada :
Set to 1
Set to 2
Toggle
Set to 1 on press and to 0 on release
Set to 0 on press and to 1 on release
Navigation button (Run command)
Types of button in FTB scada system
Set to 1 button press than button is permanent On
Set to 0 button press than button is permanent Off
When be push button first time than it will time on,
When be push button second time than it will off.
For example, use the maintained push button for changing modes, such as Auto to Manual, or Metric to Imperial.
Set to 1 on press and 0 on release.
Set to 0 on press and 1 on release.
Navigation (Run Command) push buttons can be configured to let the operator perform the following actions: show previous display screen, show next display screen, and show a list of previously shown screens.
Section-2 : Different types of animation of SCADA
Fill , Visibility & Color Animation
Fill Animation :
Use fill animation to change the level of fill in an object, based on the result of an expression or a tag value, in relation to the specified minimum and maximum values.
The object’s fill level is proportional to the value of the expression. For example, if the value of the expression is halfway between the minimum and maximum values, the object will be half full.
Fill animation does not affect string input, numeric input, or recipe objects, or push button objects. It also does not affect transparent objects or line objects, even if those objects are grouped into a single object.
Visibility :
Use visibility animation to make an object visible or invisible, based on a tag value or the result of a logical expression. If an object is invisible, no other animation applied to the object is evaluated, to prevent unnecessary processing.
You can apply visibility animation to all FactoryTalk View graphic objects. Visibility animation overrides an object’s visibility property, if there is a conflict.
The following types of objects can only have visibility animation:
Images and panels
Push buttons (except the button type)
Indicators
Gauges and graphs
Key objects
Advanced objects (except arrows and labels)
Color :
Gauges and graphs Key objects Use color animation to change an object’s color, based on a tag value or the result of an expression. You can specify up to 16 color changes (A to P) for any object.
Choosing between Solid, Gradient, Original, and Shaded Fill Styles allows for more animation options for the blinking object.
Solid– Allows you to change the colors, and they will have a solid look to them.
Gradient – Allows you to change the colors, and they will have a gradient look to them. If you select Gradient as the Fill Style, the Fill color box changes to gradient. Click it to bring up the gradient fill dialog box to configure the gradient fill.
Original – Retains the colors and the shading of the object to what was originally imported. Both the line and fill color can be altered from the original using Blink.
Shaded – Uses a tight dot pattern to soften or give a shaded appearance. This fill style takes effect only on a group object that is composed of individual objects with dark to light colors, such as Symbol Factory objects.
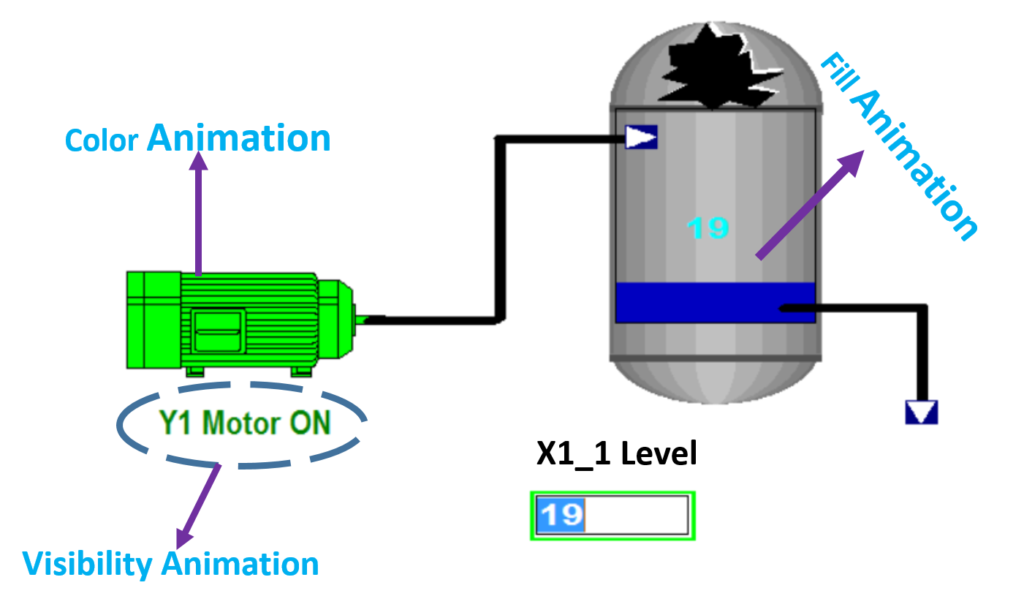
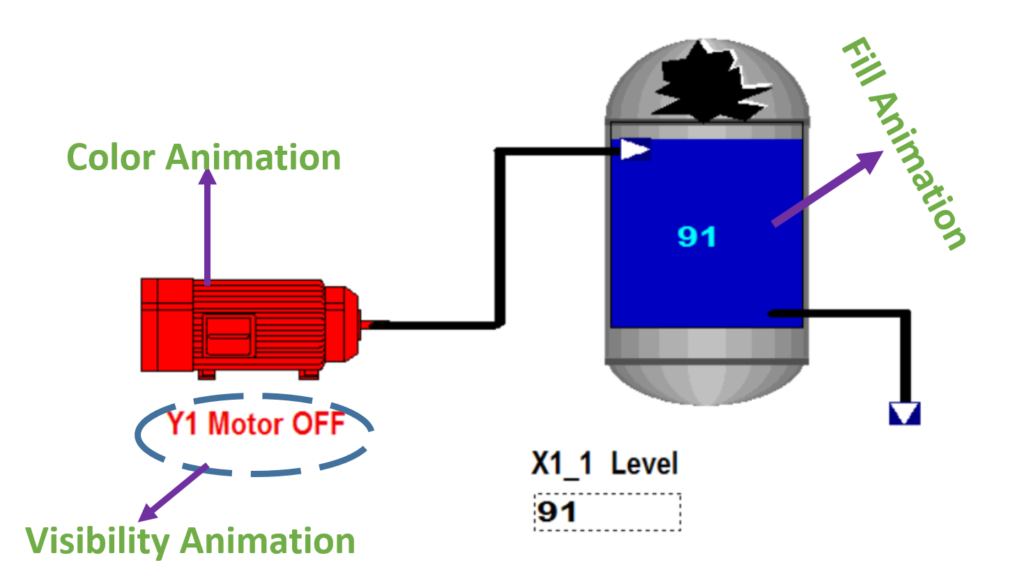
Example :
SCADA Animation Topics:
Visibility: If “Y1 ” motor is turned on the text “MOTOR ON” appears otherwise if “Y1” motor is turned off the text “MOTOR OFF” appears.
Color: If “Y1” motor is on then motor color will be green and if “Y1” motor is off then motor will be red.
Fill:if the required value of the parameter “X1” changes, fill the tank level with blue color.
Section-3 : Horizontal, Vertical Movement & Rotation in SCADA
Horizontal Movement, Horizontal Slider
Moving an object horizontally in a display
Use horizontal position animation to move an object horizontally in a display, based on the result of an expression or a tag value, in relation to the specified minimum and maximum values.
The object’s horizontal position is proportional to the value of the expression. For example, if the value of the expression is halfway between its minimum and maximum values, the object will be halfway between its minimum and maximum pixel offset.
Creating a horizontal slider:
Use horizontal slider animation to create a graphic object that sets the value of a tag. To do this, define a path for the object and then use the mouse to move the object horizontally.
The pixel position of the object is translated into values that are written to the tag. If the tag value is changed externally, the position of the slider also changes. An object can have both vertical and horizontal slider animation
Vertical Movement, Vertical Slider
Moving an object vertically in a display:
Use vertical position animation to move an object vertically in a display, based on the result of an expression or a tag value, in relation to the specified minimum and maximum values.
The object’s vertical position is proportional to the value of the expression. For example, if the value of the expression is halfway between its minimum and maximum values, the object will be halfway between its minimum and maximum pixel offset.
Creating a vertical slider:
Use vertical slider animation to create a graphic object that sets the value of a tag. To do this, define a path for the object and then use the mouse to move the object vertically.
The pixel position of the object is translated into values that are written to the tag. If the tag value is changed externally, the position of the slider also changes. An object can have both vertical and horizontal slider animation.
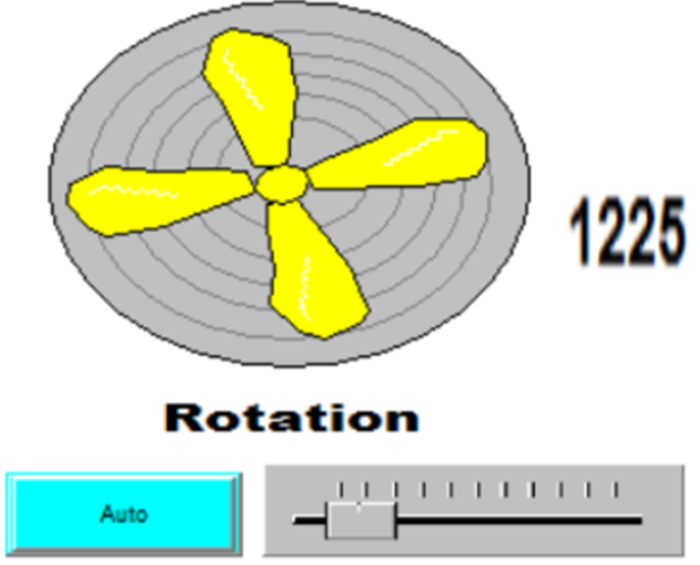
Rotation
Rotating objects:
Use rotation animation to rotate an object around an anchor point, based on the result of an expression or a tag value, in relation to the specified minimum and maximum values.
The degree of rotation is proportional to the value of the expression. For example, if the value of the expression is halfway between its minimum and maximum values, the object will rotate half the specified rotation range.
Section-4 :How to use Macros, Touch & Object Keys animation in SCADA
How to Create macros in SCADA
Macros: A macros is a list of commands or command symbols stored in a text file to run a macros you use its name just as you would a command. For example, you can type the name of the macro in the command line and then press Enter. the command in the macro will be executed in the order in which they are listed.
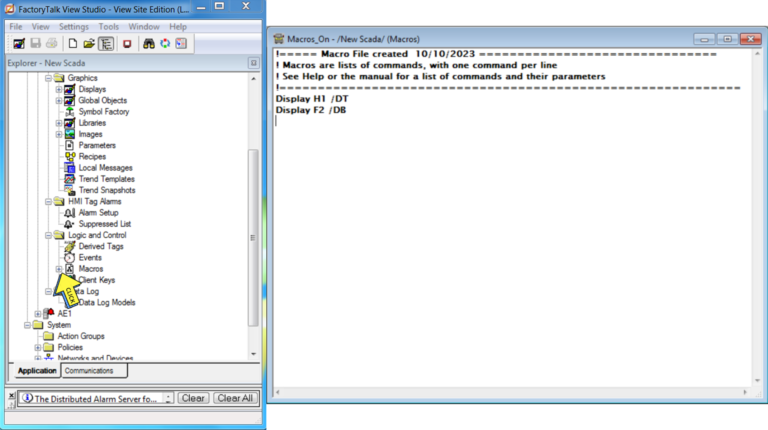
To create a macro:
In FactoryTalk View SE, in the Explorer window, double-click Logic and Control \ Macros to open the Macros editor.
In the Macros editing window, type the commands and parameters that specify what the macro will do when it runs.
Save the file using a name that does not conflict with commands or symbols. If names conflict, the command or symbol will run rather than the macro. Macros are given the file extension . mcr when you save them.
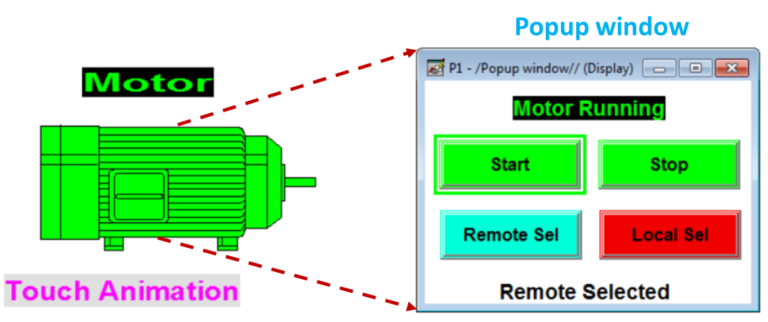
How to use Touch animation in SCADA
Touch Animation:
Use the Touch tab to set touch animations for an object. You can use the press release or repeat action options to specify whether objects with touch animation are to be acted upon when touched at run time.
How to use Object Keys animation in SCADA
Object Keys:
A key that has had its original action replaced by a command or macro. Object keys are set up in the Graphics editor on a per object basis. when the object has input focus, the keys or mouse button assigned to it are available. The operator presses a key or mouse button to carry out the command or macro associated with it.
Section-5 :How to create Alarms in Scada
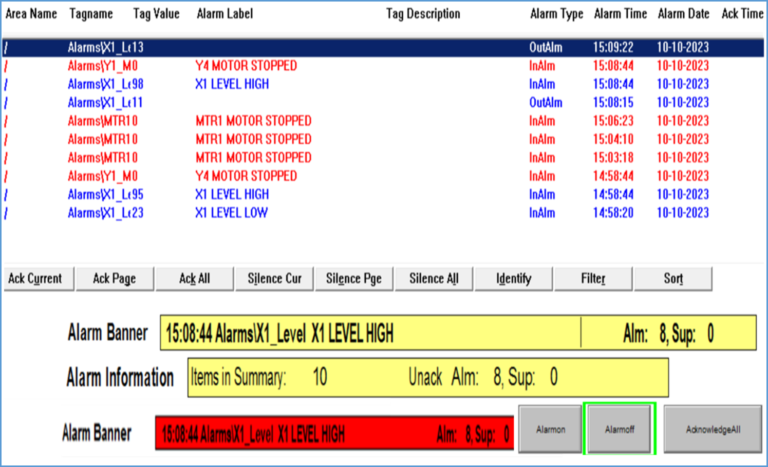
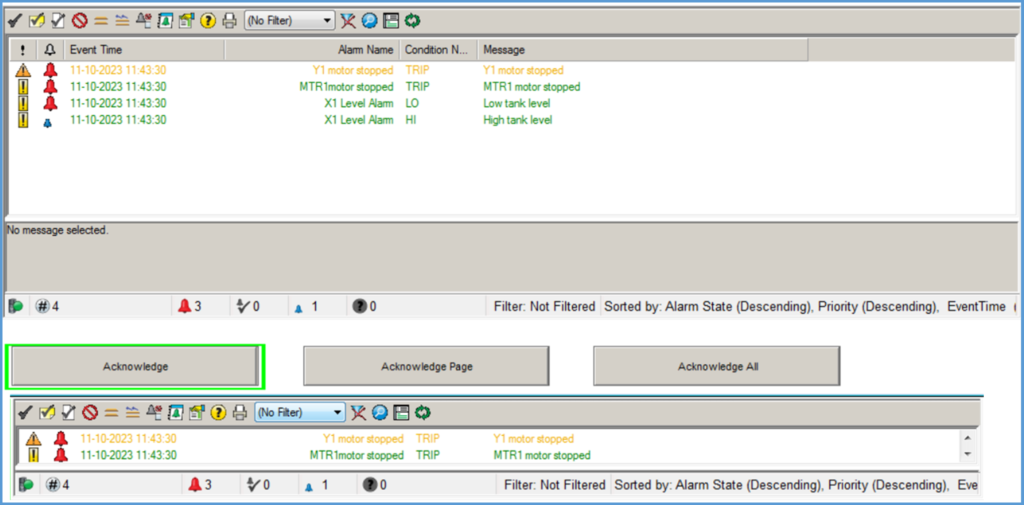
Creating an HMI tag alarm summary
An alarm may indicate that an equipment or process has stopped operating within acceptable, predetermined limits, or it may indicate a breakdown, malfunction. Often, it is also important to have a record of the alarms and whether they were acknowledged.
Alarm threshold for analog tags. An HMI analog tag can trigger multiple alarms when its value crosses various levels or thresholds, each with a different level of severity, to indicate the importance of the alarm. The lowest threshold is 1 and the highest is 8. You don’t have to use all eight thresholds for a single tag, but the ones you use should be set in ascending order.
Section-6 : How to create Alarms and
Events in SCADA
Alarm and Events server
To create a new alarm, use the FactoryTalk Administration Console or FactoryTalk view Studio. Formerly known as RSView Studio.
The development environment for creating and testing local and network FactoryTalk view Site Edition applications.
On the all Alarms tab in the Alarm and Event setup window, click the New button, and then click the types of alarm you want to create:
Digital: defines an alarm condition that monitors a tag for either a zero value or non-zero value.
Level: defines one or more alarm conditions (LO,LOLO,HI,HIHI) that monitors an analog tag. The alarm conditions compare the value of the tag against a static value or the value of another tag. Each level can uniquely identify an alarm threshold, a severity, and an alarm message.
Deviation: defines an alarm condition that evaluates a analog tag. A alarm condition compares the value of a tag against a deviation from a target value, which can also be provided by a tag.
Section-7 : What are trends, Charts or graphs in SCADA
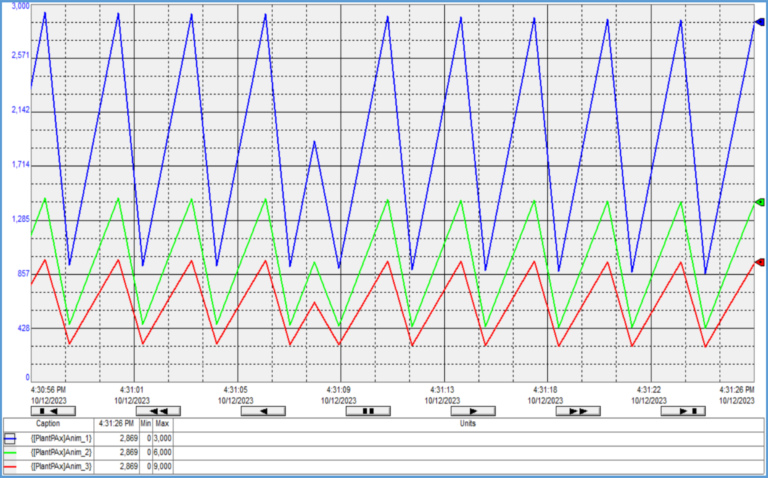
Real Time Trends
Trends ( or charts, graphs ) are important for an industrial automation system.
They record real time data from field, retrieve historical data, and present them in graphical ways.
The Trend Properties dialog box contains several tabs, in which you can set up the trend’s data, appearance, and behavior:
In the General tab, set up the trend’s data server (real-time or historical polling), chart title, chart style, and update mode.
In the Display tab, set up the appearance of the trend display.
In the Pens tab, set up pen tags and expressions, and the appearance of pens in the trend.
In the X-Axis tab, set up the trend’s horizontal axis.
In the Y-Axis tab, set up the trend’s vertical axis.
In the Overlays tab, add or remove snapshots of historical data.
In the Template tab, set up properties for trend templates.
In the Runtime tab, set up ways to interact with the trend at run time.
In the Common tab, set up the trend’s size and position in the graphic display.
Section-8 : How do we take backup of FactoryTalk View Se SCADA Project ?
(First Method) HMI Server Backup and Restore utility
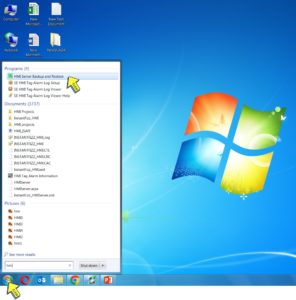
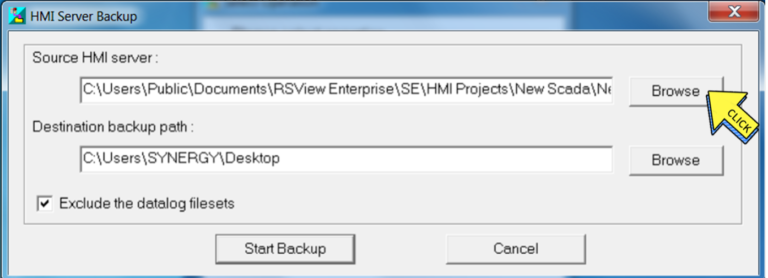
Step -1
Open “HMI Server Backup and Restore” utility.
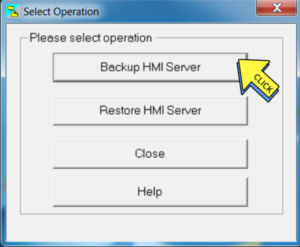
Step -2
Click on “Backup HMI Server” button.
Step -3
Select path of Source Server Project.
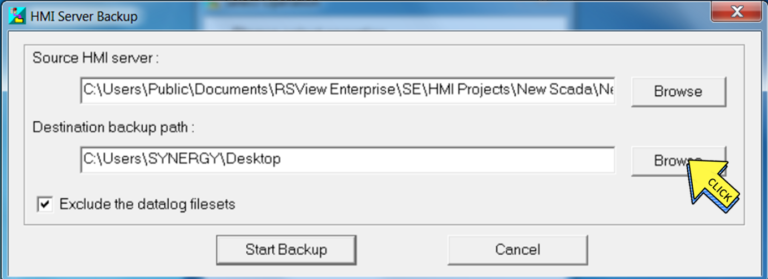
Step -4
Select destination backup path. Where you want to Copy, Save or Backup project.
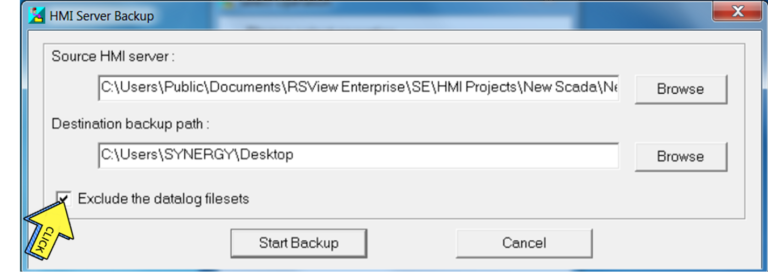
Step -5
Tick the Check box option to Exclude the datalogging path.
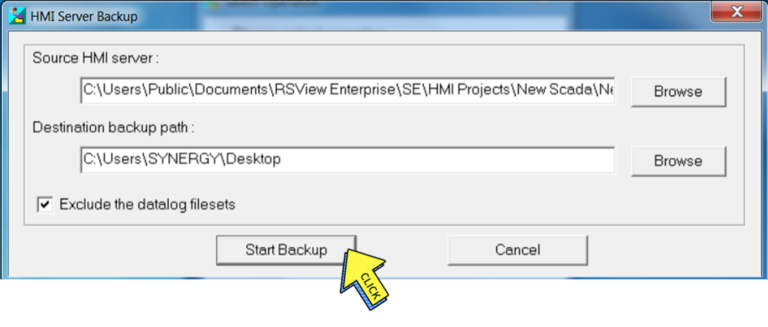
Step -6
Click on the start backup button.
Step -7
Now the backup of the project has been saved an Destination folder.
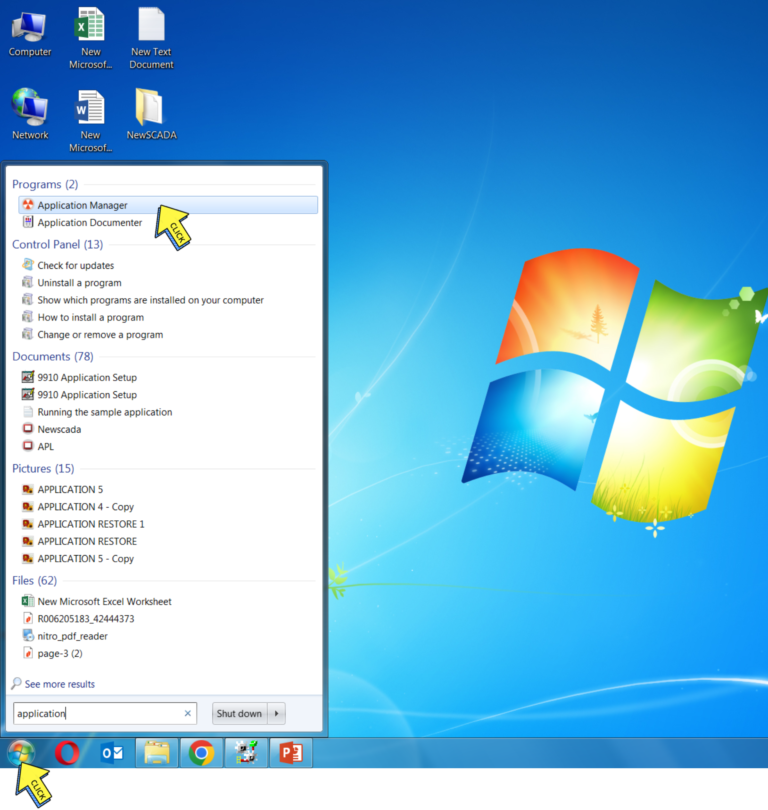
( Second Method ) Project backup by "Application manager" utility
Step-1
open Application manager utility.
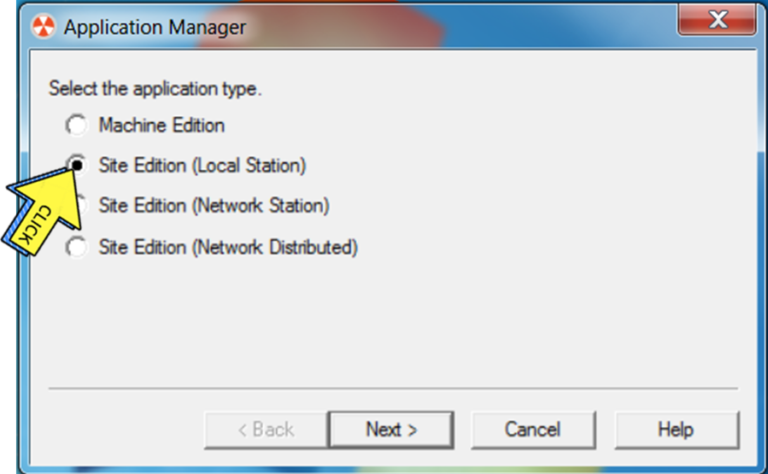
Step-2
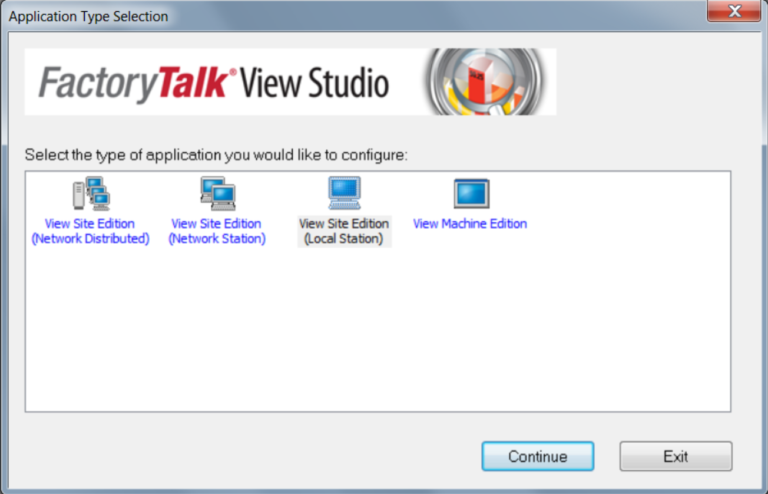
Select on “Site Edition(Local Station) ”
Step-3
Select “Backup application”.
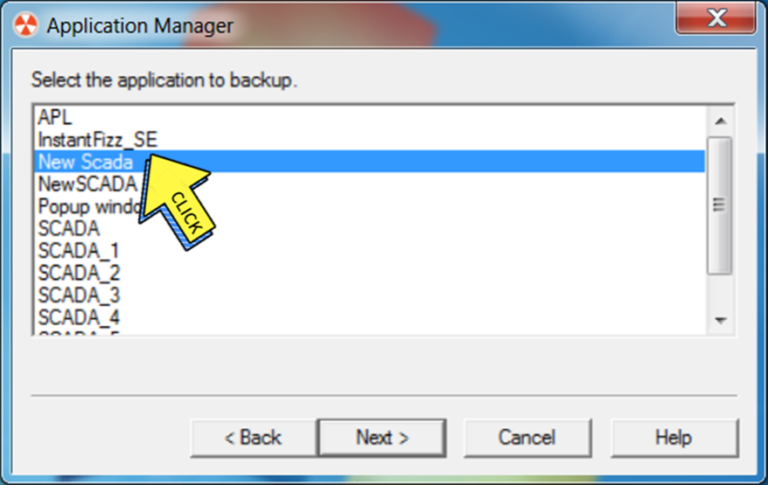
Step-4
Select your project.
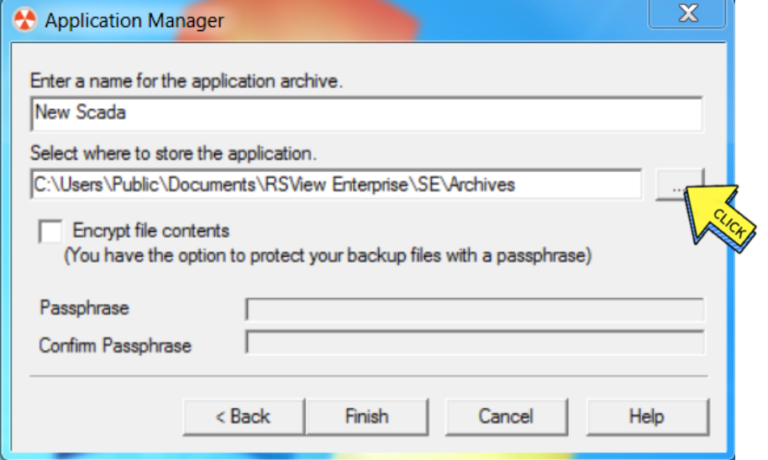
Step-5
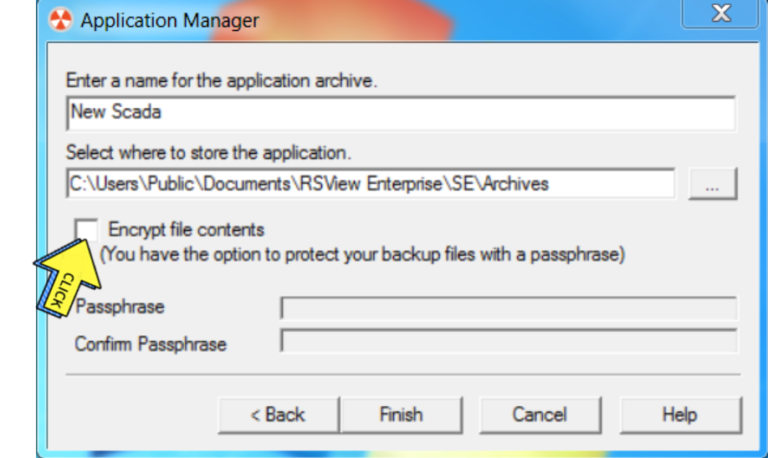
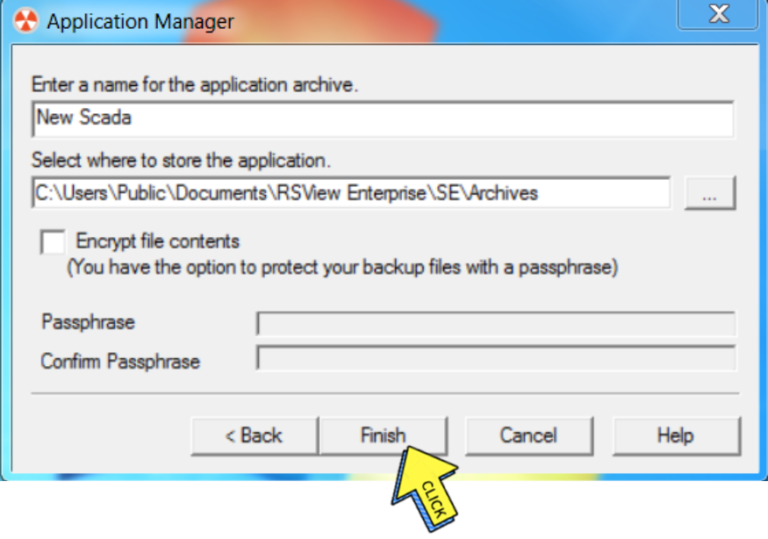
Select where to store the application. Where you want to Copy, Save or Backup project.
Step-6
Uncheck encrypt file contents
Step-6
Click on the Finish button and a backup will appear on the desktop.
In this way you can tack backup or your Scada project.
Section- 9 : How to Restore FTV Se SCADA Application ?
(First Method) Restore by "Application manager"
Step-1
open Application manager utility.
Step-2
Select on “Site Edition(Local Station) “
Step-3
Select “Restore application”.
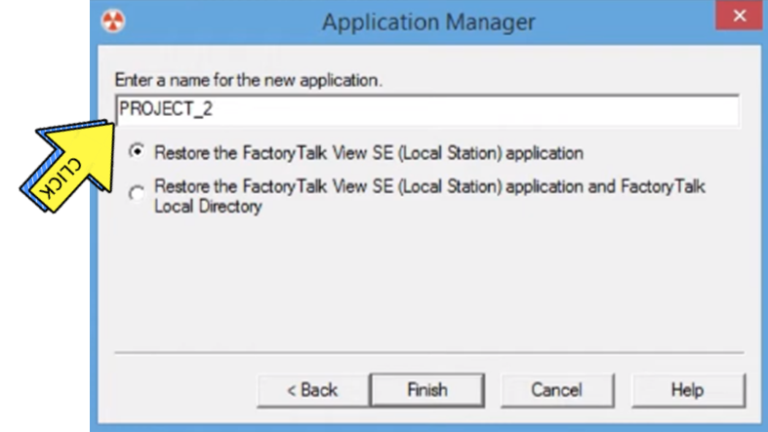
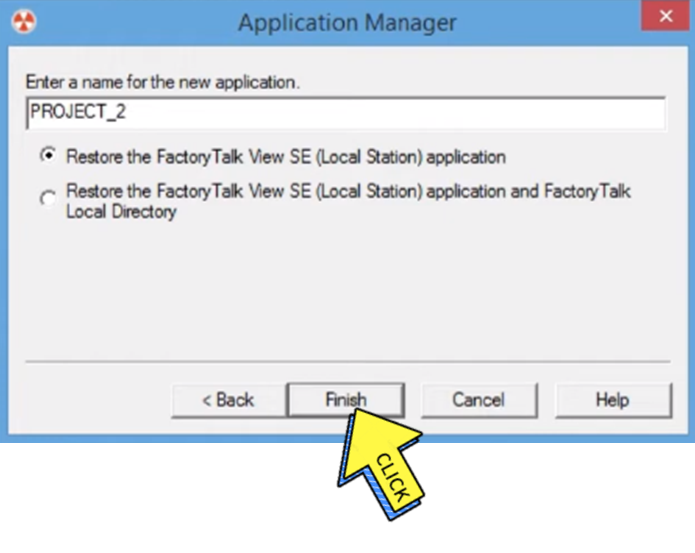
Step-4
Specify the application archive to restore.
Step-5
Select your project.
Step-6
Click on the Finish button and a backup will appear on the desktop.
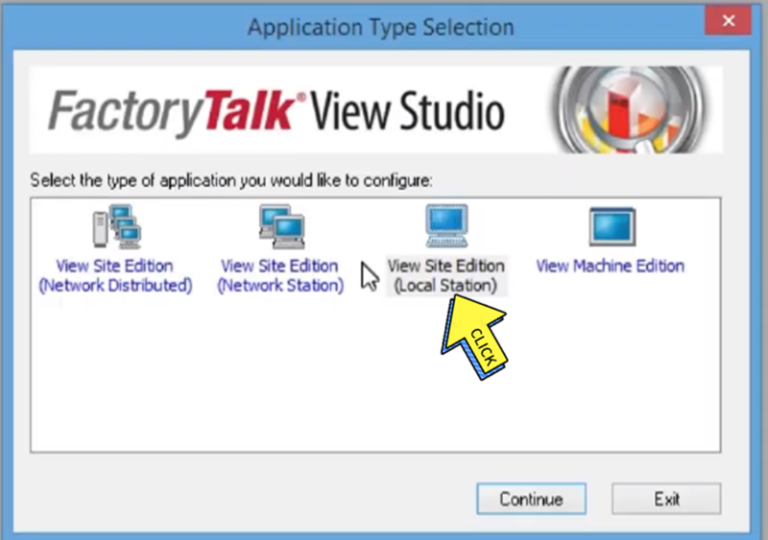
(Second Method) How to restore backup of FactoryTalk View SE SCADA Project? (Import backup of FactoryTalk View SCADA)
Step-1
Open “View Site Edition (Local Station)”
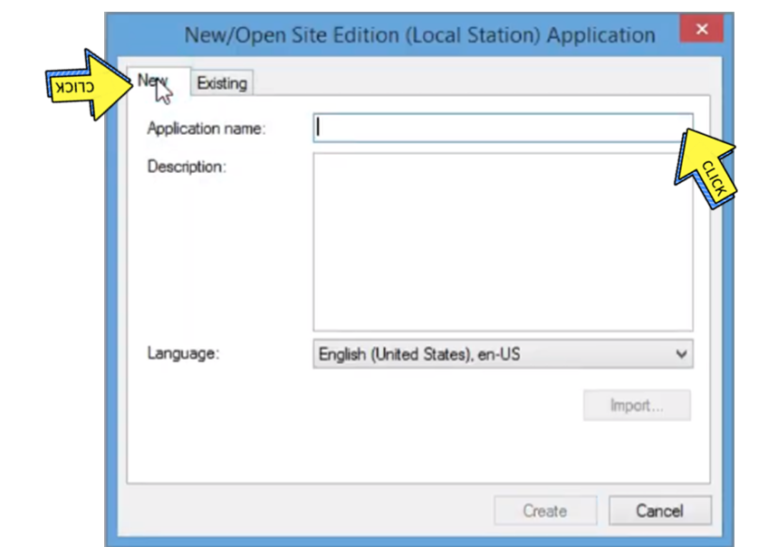
Step-2
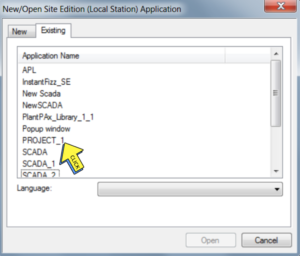
Click on “New button” and
Select “Application name”
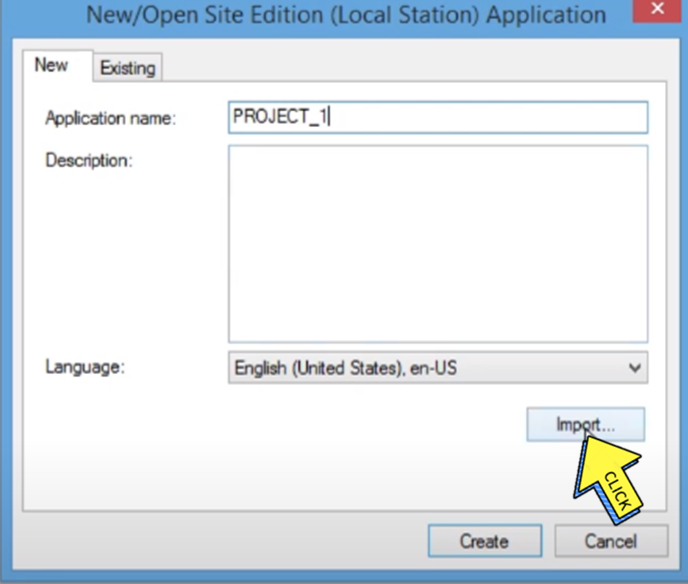
Step-3
Click on “Import”
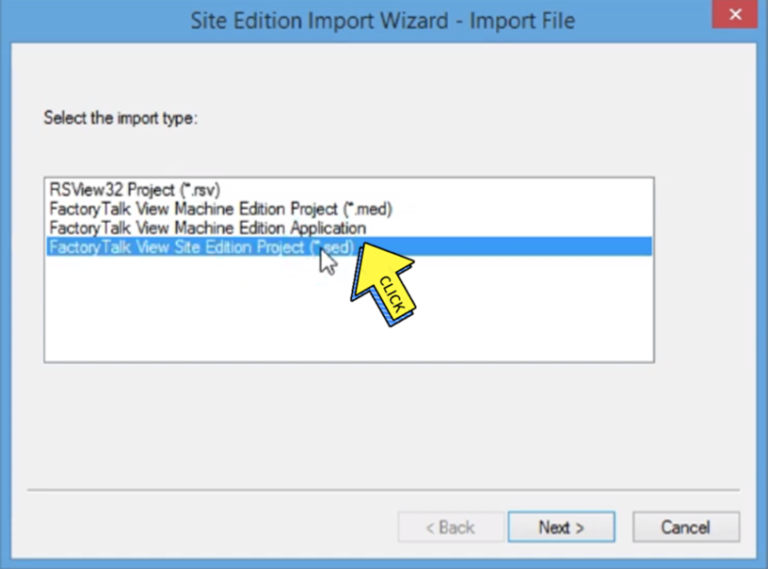
Step-4
Select the “import type”.
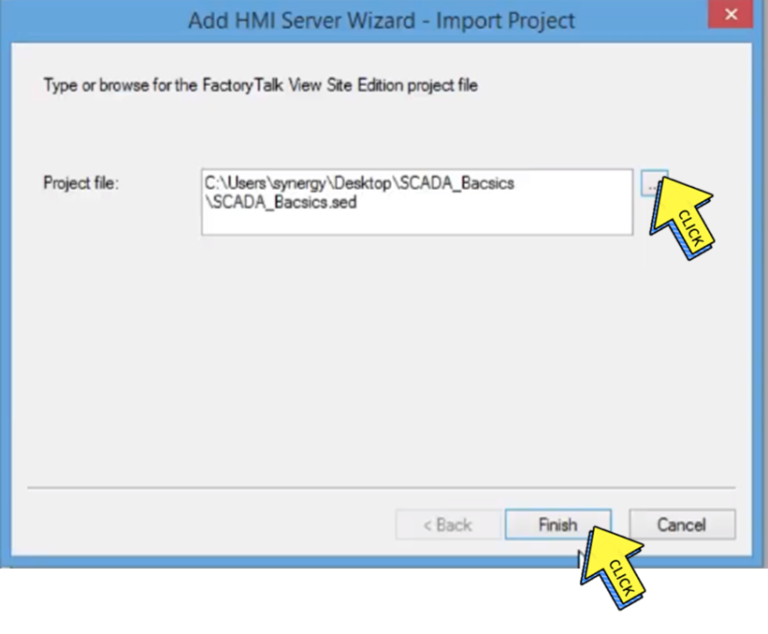
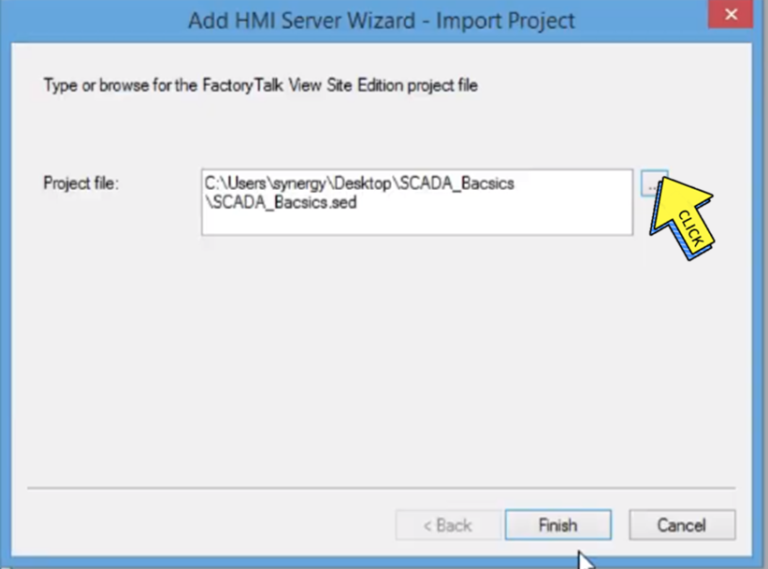
Step-5
Type or browse for the FactoryTalk View Site Edition project file.
Click on “Finish button” aa
Step-6
Type or browse for the FactoryTalk View Site Edition project file.
Section-10 : How communicate FactoryTalk View SE SCADA Client?
Communication a FactoryTalk View SE Client
Step-1
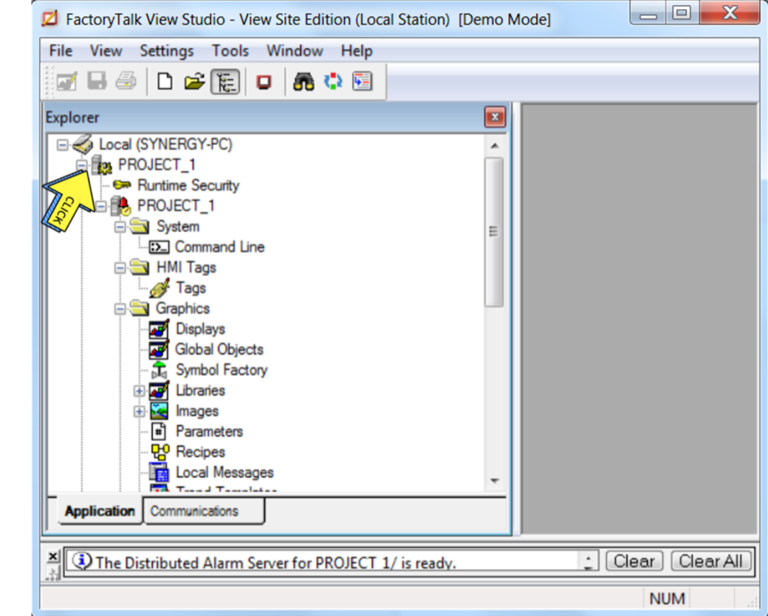
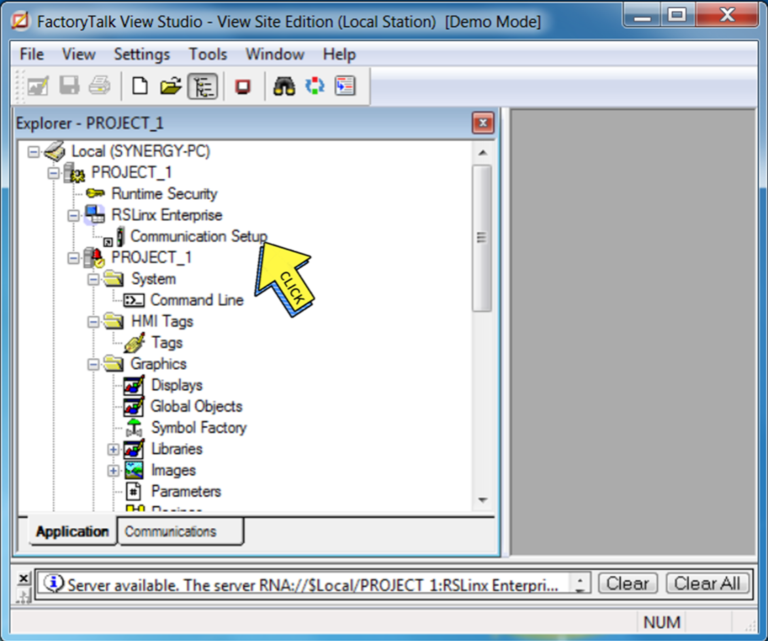
Open “FactoryTalk View Studio”.
Step-2
Select on project .
Step-3
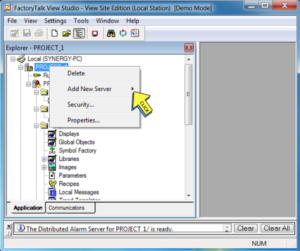
Right click on project for Communication.
Step-4
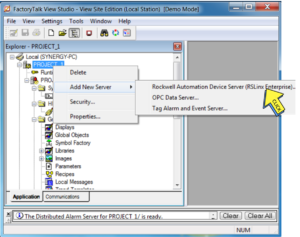
Add new server
Step-5
Click on Rockwell Automation Device Server (RSLinx Enterprise).
Step-6
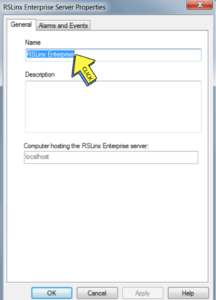
Enter communication name.
Step-7
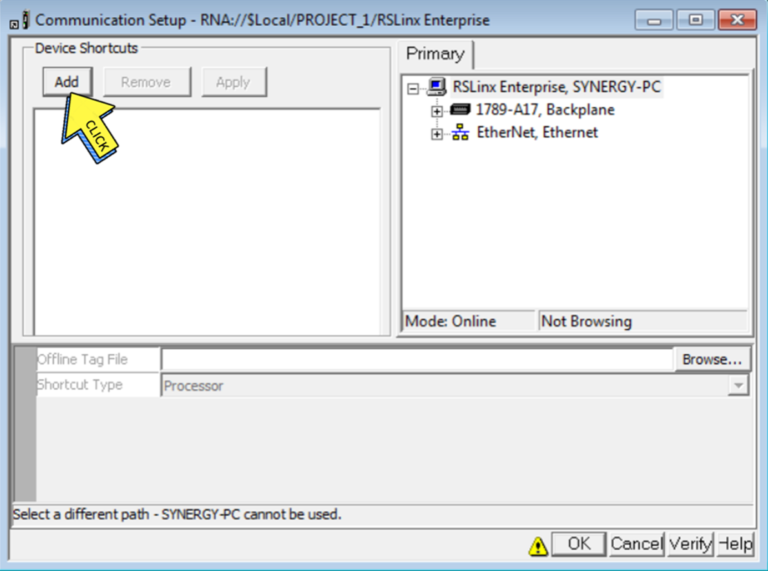
Open communication Setup.
Step-8
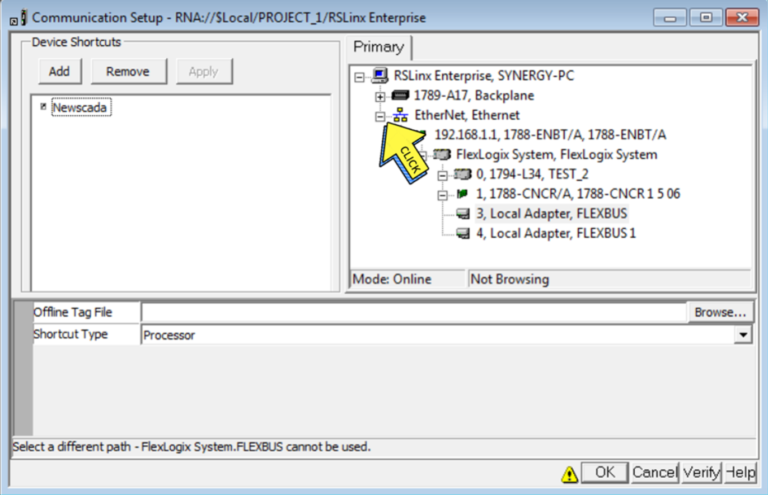
Add on Device name.
Step-9
Select on PLC.
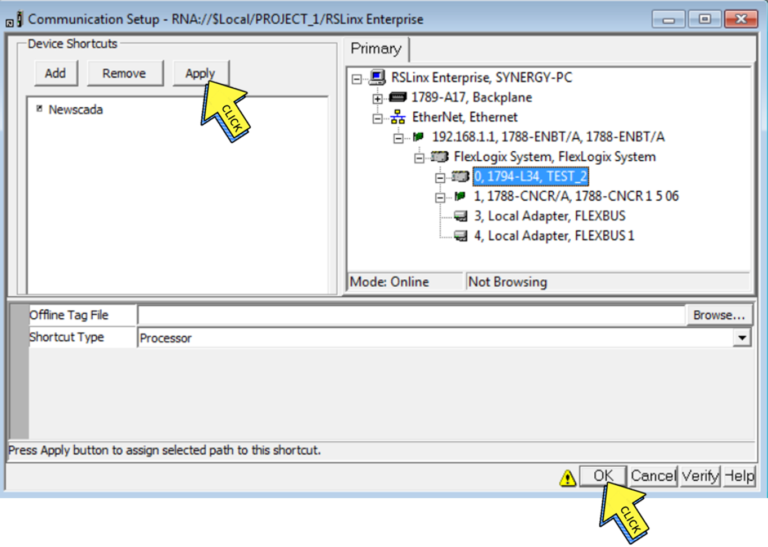
Step-10
Click on Apply, Ok.
Section-11 : How communicate FactoryTalk View SE SCADA Client with PLC ?
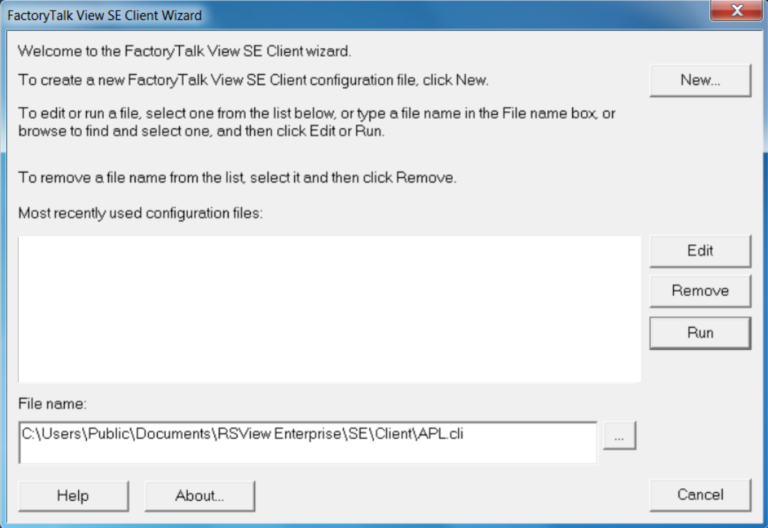
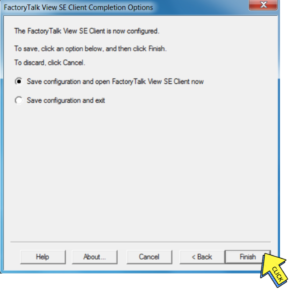
Creating a FactoryTalk View SE Client
Step-1
Open “FactoryTalk View Site Edition Client”.
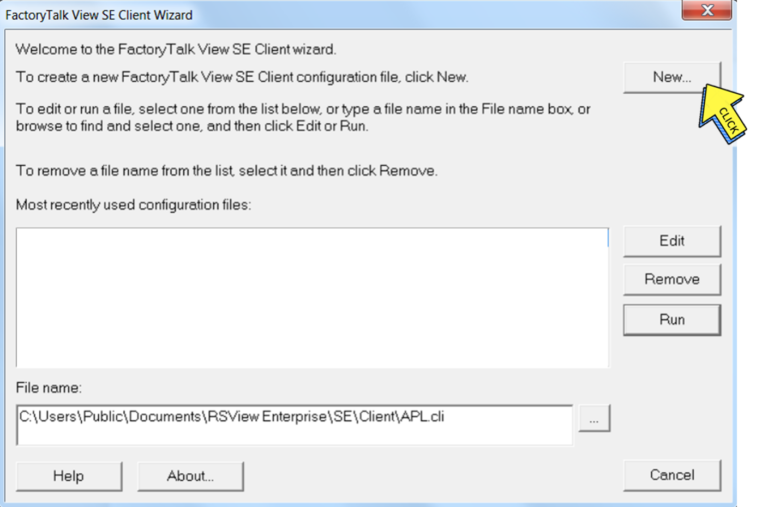
Step-2
Click new button. Next>
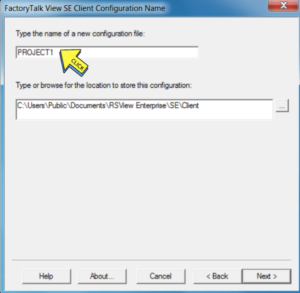
Step-3
Type the name of a new configuration file
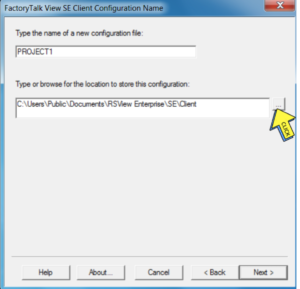
Step-4
Type or browse for the location to store this configuration. Next>
Step-5
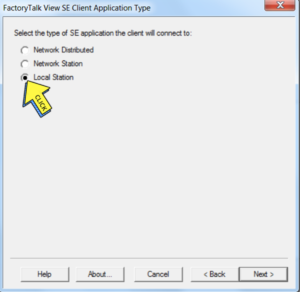
Select on “Local Station”. Next>
Step-6
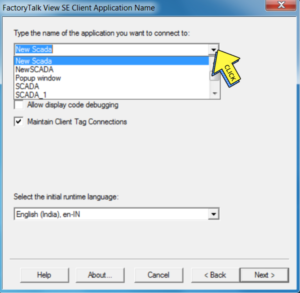
Select on Project name. Next>
Step-7
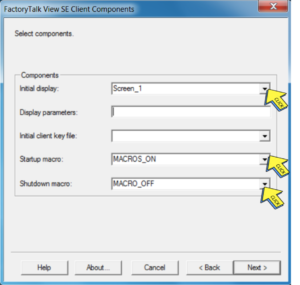
Select on your First Display, Select Start-up macro, Shutdown macro. Next>
Step-8
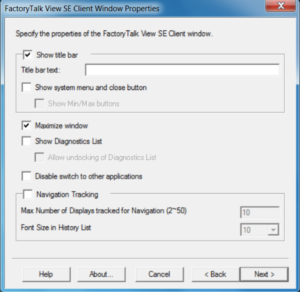
Tick on options Show title, Maximize window, Allow client to be resized at run time. Next>